Creating a LibreSource Synchronizer
Creaing a workspace with the LibreSource Synchronizer implementation is quite easy too :
$> so6 createqueue <queue directory>
where <queue directory> is the location of the workspace.
For example, you can type:
so6 createqueue ~/queue1A directory queue1 is created in your home directory with few subdirectories and files inside.
$> ls -l  ~/queue1/
total 6
drwxr-xr-x    2 root     root           48 May 18 09:51 ATTACH
drwxr-xr-x    2 root     root           48 May 18 09:51 CMDS
drwxr-xr-x    2 root     root           48 May 18 09:51 PATCHFILES
-rw-r--r--    1 root     root          116 May 18 09:51 so6.properties
The file ~/queue1/so6.properties contains:
#do not edit
#Tue May 18 09:51:27 CEST 2004
so6.last.ticket=0
so6.bin.ext=class pdf ps eps exe zip jar gif jpg png
- The so6.last.ticket is the last ticket delivered by the LibreSource Synchronizer. The so6.bin.ext is a list of binary extensions.
Some LibreSource Synchronizers are also able to create equivalent compressed patch to improve the really first integration…
- The CMDS directory contains the extracted commands used for generating an equivalent smaller patch.
- The ATTACH directory contains the binary attachement of the extracted commands.
Creating workspace
If you use the shared directory interface, you can do that by typing :
$> so6 createworkspace ~/foo ~/queue1 "foo"
- ~/queue1 is the location of shared directory containing the queue.
- /foo is a directory for your workspace. The directory must exists before creating the workspace.
$> ls -Rtal  ~/foo/
/root/foo/:
total 3
drwx------   26 root     root         1224 May 18 11:07 ..
drwxr-xr-x    3 root     root          104 May 18 11:06 .so6
drwxr-xr-x    3 root     root           72 May 18 11:06 ./root/foo/.so6:
total 6
drwxr-xr-x    2 root     root           80 May 18 11:06 1
drwxr-xr-x    3 root     root          104 May 18 11:06 .
-rw-r--r--    1 root     root           58 May 18 11:06 workspaceId
drwxr-xr-x    3 root     root           72 May 18 11:06 ../root/foo/.so6/1:
total 5
-rw-r--r--    1 root     root          206 May 18 11:06 so6.properties
drwxr-xr-x    2 root     root           80 May 18 11:06 .
drwxr-xr-x    3 root     root          104 May 18 11:06 ..
So6 has created a directory
~/foo/.so6 for storing data relative to the synchronization. A subdirectory
1 corresponds to the workspace connection with
queue1.
Anothers connection can exists. In this case they will be labelled
2,
3,
4...
The file workspaceId contain a unique identifier for the workspace.
$> cat  ~/foo/.so6/workspaceId
bb0vb6jc6Ct3BrWqiYH1GDhgWGVikI5CPmpJFZkUKaSjMUTw9JLr3
And the the file
so6.properties contains information about workspace connection 1.
$> cat  ~/foo/.so6/1/so6.properties
#Do not edit
#Tue May 18 11:06:41 CEST 2004
so6.connection.path=/root/foo/.so6/1
so6.clienti.name=fr.loria.ecoo.so6.client.DummyClient
so6.path=/root/foo
so6.wsc.name=foo
so6.client.dummy.path=/root/queue1
Update and commit
If you use the command-line interface, things are easy too.
$> cd  ~/foo/
$> mkdir toto
$> echo "toto" > toto.txt
$> so6 commit -w . "toto"Start the commit process
[  25 % |   | % ] : Detecting local remove
Building patch file
[  50 % |   / % ] : Inserting local command
Connecting to the server
[  75 % |   - % ] :
Patch local reference
[ 100 % | 100 % ] : Finished
Commit process finished*** Report ***---
A toto.txt
A toto
---
We have created two entries: a directorty toto and a file "toto.txt" containing the string "toto". When commiting, some information are displayed to show the progress of the commit operation and at the end a report is printed out.
The commit process detects local operations, build an XML patch file and send it the server.
The report is in the CVS style and show with the letter
A that 2 entries have been added.
If now we create a new workspace
bar with the command
$> cd ~
$> mkdir  ~/bar
$> so6 createworkspace  ~/bar  ~/queue1 "bar"
The initial workspace is empty. We can fill it by updating it.
$> so6 update -w . Start the update process
Download all patch
[  25 % |   / % ] : Updating…
Merging
[  25 % |   - % ] :
Check local operartions
[  33 % |   | % ] : Detecting local remove
Patch local path
[  41 % |   / % ] : Merging patch (AddTxtFile(toto.txt))
Patch ref copy
[ 100 % | 100 % ] : Finished
Update process finished
*** Report ***Merging patch file: /root/bar/.so6/1/RECEIVED/1.2
---
A toto.txt
A toto
---
The update process is quite similar to the commit process. First, we detect local operations, in this case there is no local operations.
Then we download patches from the queue, we merge it with local operation and we apply the result.
In this situation, merging is straightforward so the two files are updated.
Many situations of conflicts can occur during the update process. We details all these situations later.
Produce, Find and Resolve conflicts
It is easy to produce conflicts when two or more users update concurrently and asynchronously replicated copies. There are so many cases of conflicts that it is difficult to be sure that all conflicts are covered. That's why we use the transformational approach and a theorem prover.
All conflicts are covered in section
Operational Transformation .
In this section we show how common conflicts are producted and how to resolve it with so6.
Suppose two copies of the same files "q.txt" edited concurrently. The file in the initial state contains a single line "I am Q ;-D". Then two users
foo and
bar append concurrently a different line:
- foo appends "I am foo"
- bar appends "I am bar"
The general log of these operations is the following :
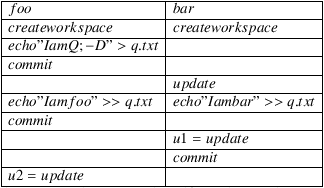 Figure 1
 - Scenario
At step u1, when
bar updates his workspace, he gets the following display :
$> so6 update -w . Start the update processDownload all patch
[  25 % |   / % ] : Updating…
Merging
[  25 % |   - % ] :
Check local operartions
[  33 % |   / % ] : Detecting local remove
Patch local path
[  41 % |   - % ] : Merging patch (AddBlock(q.txt,2,1))
Patch ref copy
[ 100 % | 100 % ] : Finished
Update process finished
*** Report ***Merging patch file: /root/bar2/.so6/1/RECEIVED/2.2
---
C q.txt
---
The
C q.txt line means that a conclit has been generated in file
q.txt after step u2 both
foo and
bar can see that q.txt contains :
$> cat q.txt
I am Q
>>>> CONFLICT >>>> ADD - ADD
>I am foo
==== foo / bar
>I am bar
<<<< CONFLICT <<<<
And both users can find conflicts at any time using the command
so6 findconflict$> so6 findconflict -w .
Start searching conflict in workspace : ./.so6/1/so6.properties
Conflict in file q.txt
LibreSource Synchronizer contains a small utility programs that helps to solve the conflicts. The conflict editor extracts conflicting blocks from the file. Notice that conflicting blocks can be nested, so conflicts are represented as a tree (see
figure 2).
$> so6 conflicteditor q.txt
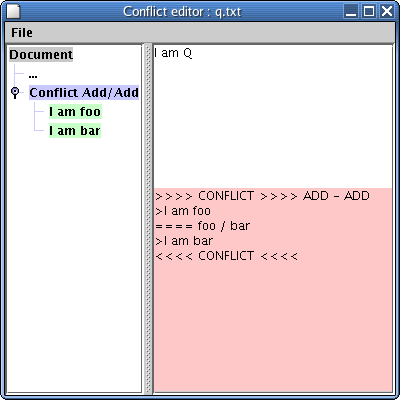 Figure 2
 - Conflict editor
Every nodes of leafs of the tree have a popup menu with a toggle button
Hide/Show. If you press it on a leaf, you add or remove the content of the leaf to the final version of the file. If you press it on a node you add or remove the block conflicting tags. In
figure 3, I choosed to keep both lines from
foo and
bar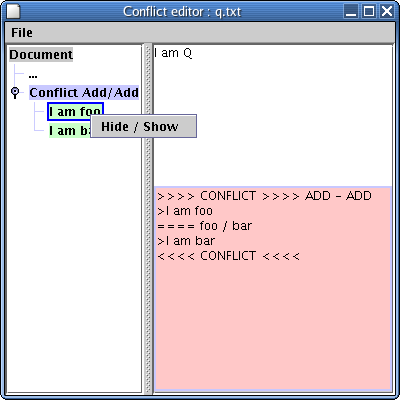 Figure 3
 - Resolve a conflict
When you have finished with conflicts you save the final result in the same file or in a different file.
Viewing History
It is possible to view the history for a file. For example, with the log developped in the previous section, you can call the historyviewer...
$> so6 historyviewer -w . q.txt
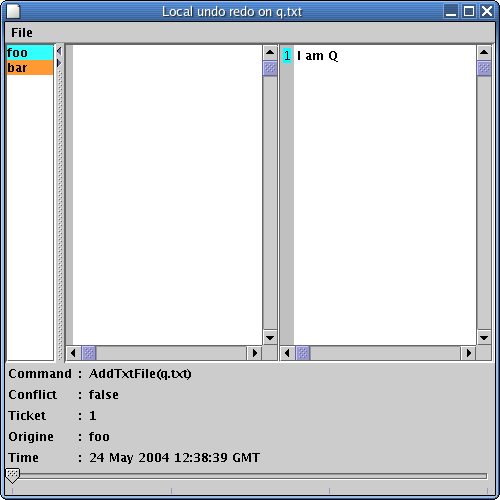 Figure 4
 - History viewer
The first column shows the contributors for this file. You can affect colors to contributor by double clicking on contributor names. The second column shows the state of the file at state n-1 and the third column shows the state of the file at state n.
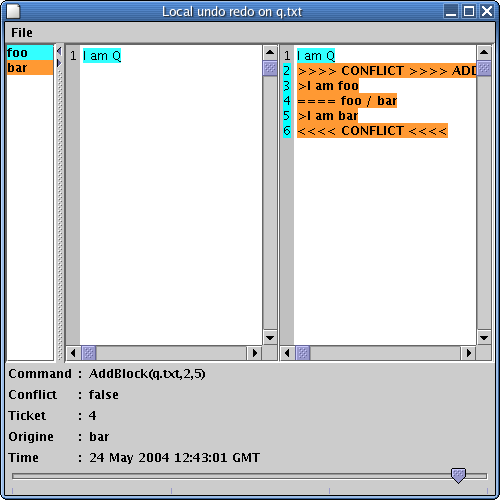 Figure 5
 - History viewer
In the initiale state, the file was empty and the first operation added the line "I am Q". If you use the slider at the bottom of the screen you can co forward and backward in the history. Figure /////figure shows the state of file q.txt at ticket 4.
You can save the file in any state you want by selecting "File/Save as" in the menu.
Reverting change, undoing, diffing
You can access at any time to the last synchronized version of files and directory. It is located in the
.so6/xxx/REFCOPY directory. We use these information to compute local log of operations. But you can use it too, in read only of course.
If you want to revert your local changes on file to the last synchronized version, just replace your file with the file located in the adequate
REFCOPY directory.
You can launch your favorites diff tools to compare files in your workspace and files in the adequate
REFCOPY directory.
Changing the type of a file
If you don't want to use automatic file type detection and you prefere to set it up manually for each file, you can do so by adding an entry manually in the file local.dbtype.
You can even complete the local.dbtype automatically, and change only some file types. To do so, you have run the program
$> so6 updatelocaldbtype wsPath
where
wsPath is the absolute path of the so6.properties file.
Restoring: Atomic commit and update
If you don't want to use automatic file type detection and you prefere to set it up manually for each file, you can do so by adding an entry manually in the file local.dbtype.
You can even complete the local.dbtype automatically, and change only some file types. To do so, you have run the program
$> so6 updatelocaldbtype wsPath
where
wsPath is the absolute path of the so6.properties file.
 Figure 1 - ScenarioAt step u1, when bar updates his workspace, he gets the following display :
 Figure 2 - Conflict editorEvery nodes of leafs of the tree have a popup menu with a toggle button Hide/Show. If you press it on a leaf, you add or remove the content of the leaf to the final version of the file. If you press it on a node you add or remove the block conflicting tags. In figure 3, I choosed to keep both lines from foo and bar
 Figure 3 - Resolve a conflictWhen you have finished with conflicts you save the final result in the same file or in a different file.
 Figure 4 - History viewerThe first column shows the contributors for this file. You can affect colors to contributor by double clicking on contributor names. The second column shows the state of the file at state n-1 and the third column shows the state of the file at state n.
 Figure 5 - History viewerIn the initiale state, the file was empty and the first operation added the line "I am Q". If you use the slider at the bottom of the screen you can co forward and backward in the history. Figure /////figure shows the state of file q.txt at ticket 4.You can save the file in any state you want by selecting "File/Save as" in the menu.